Song Requests, music through your Twitch chat bot
The Song Requests feature lets your Twitch viewers uniquely interact with you, directly influencing the stream through the power of music!
This helps increase community engagement, and when set to reward loyalty, it serves as a big encouragement for your viewers on Twitch to follow and subscribe to you.
You can also carefully restrict and moderate the requests to prevent them from getting out of control, so there's no need to worry!
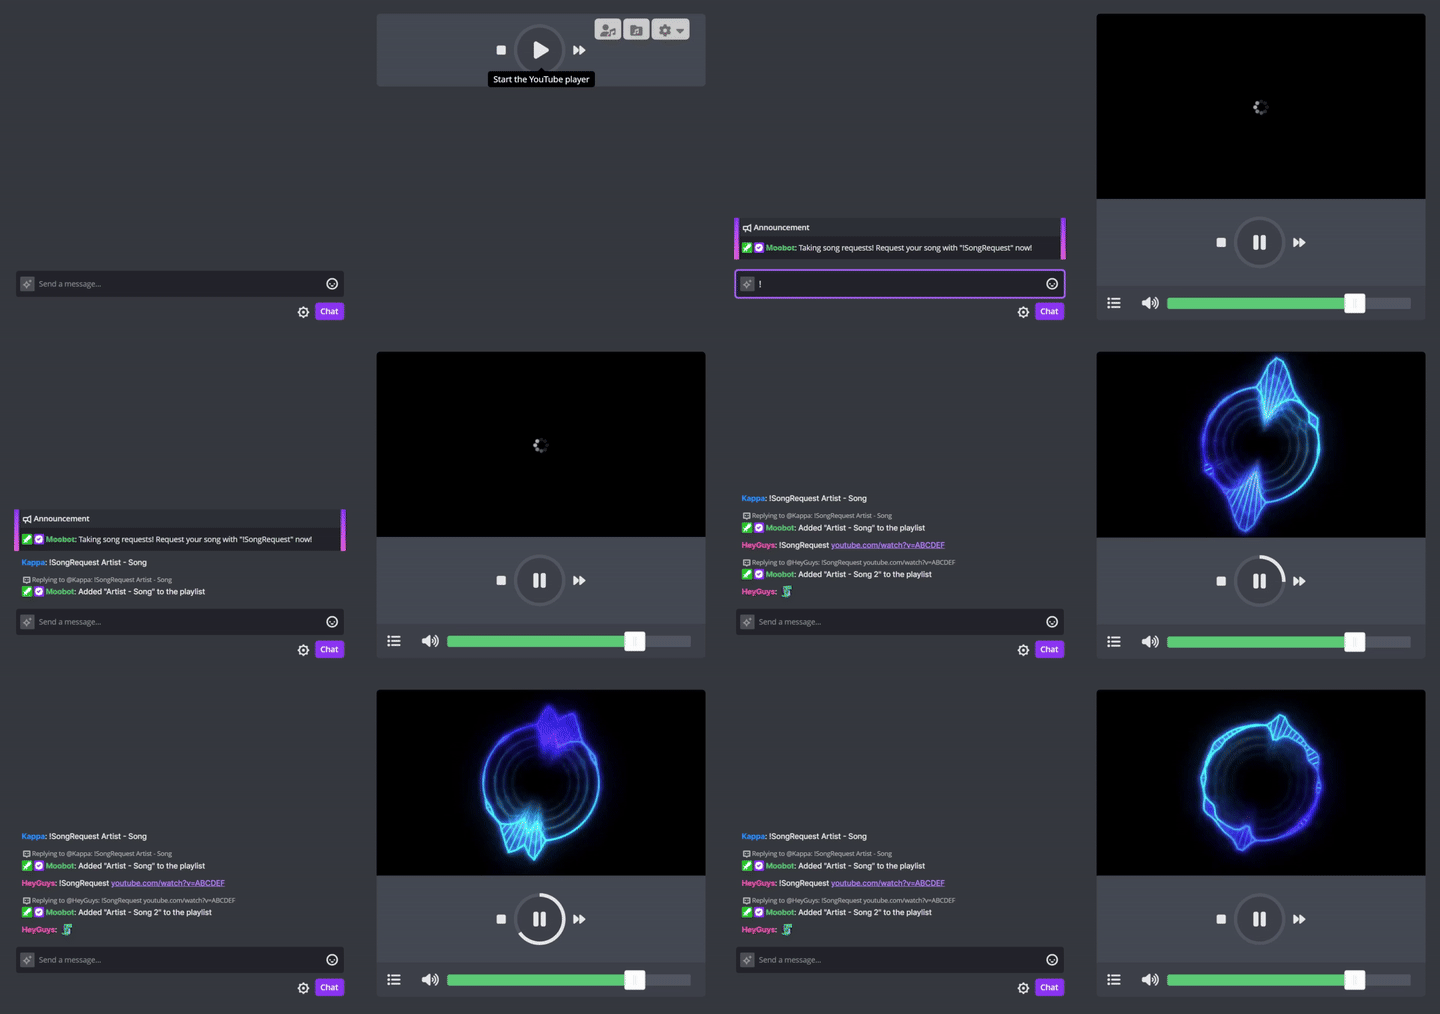
How Song Requests work
Song Requests are played through the song player widget on your Moobot dashboard. Your broadcasting software automatically picks up the audio while you're playing the songs and feeds it into your stream.
Moobot integrates with YouTube to play the requested songs, allowing your viewers to request any song from YouTube's vast library, absolutely for free! The integration with YouTube also simplifies the process for your viewers to add their requests, as most viewers on Twitch are already familiar with YouTube.
Your viewers request their songs by giving a YouTube link to your Moobot through the «!SongRequest» chat command, which adds their song to the queue.
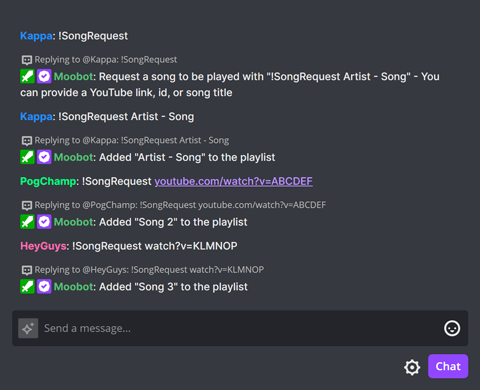
The song player widget plays the song at the top of the queue and moves to the next one once the current song has finished.
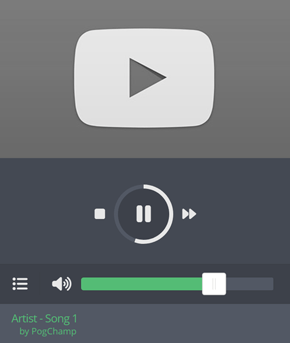
The song player playlists
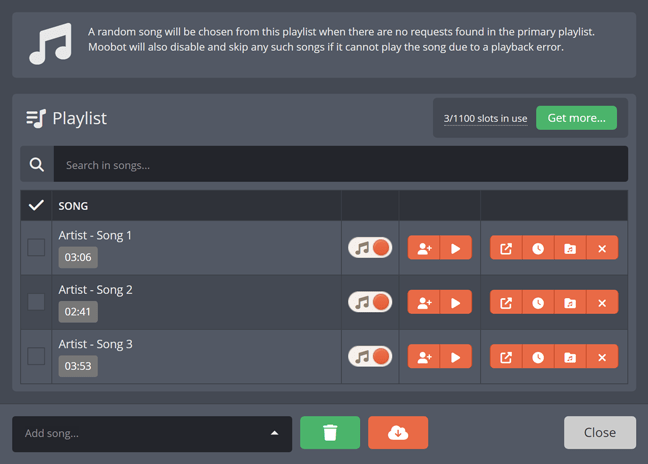
There are two different playlists for the song player: The «Primary playlist» and the «Secondary playlist».
The «Primary playlist» contains all the requests from your Twitch viewers.
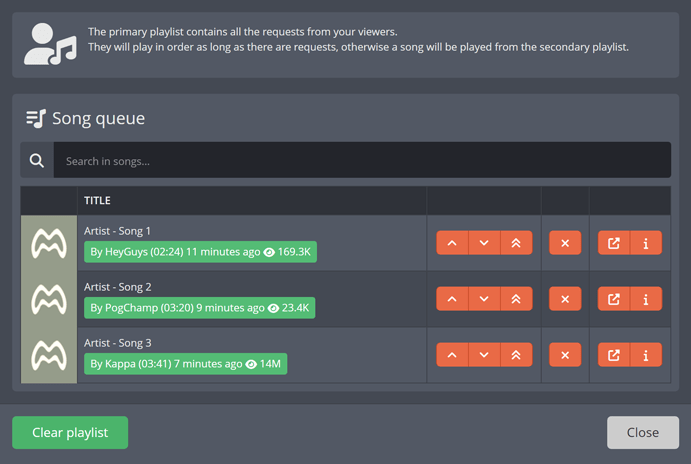
The «Secondary playlist» is your personal playlist and will play when the «Primary playlist» is empty.
How to take Song Requests
Taking Song Requests is simple, just follow these steps:
- Open the
«Features»menu from the main menu, then open the«Special Features»menu from there.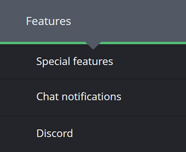
- While in the
«Special Features»menu, activate the toggle button for«Song Requests»to turn the feature on.

- Find the song player widget on your dashboard and click the play button to start the Song Requests.

- The player will play from your primary playlist if someone has already requested a song, or from your secondary playlist if not. If the song player can't find any songs to play, it will wait for a song to come in.
- Your viewers can now request their songs through the
«!SongRequest»chat command in Twitch chat.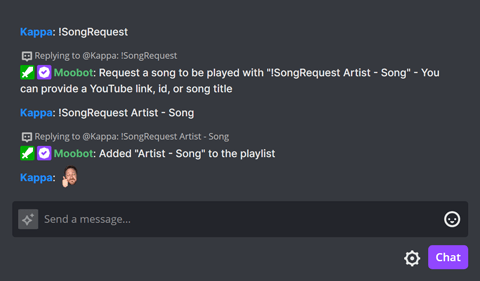
- The songs will play one after the other as long as the song player widget is playing.

- You can view and adjust the queue of requested songs in the
«Primary playlist»menu.
That's it!
Once you've gotten familiar with doing Song Requests, it's highly recommended that you adjust the settings to fit your stream.
Encouraging new Twitch subs and follows with Song Requests
Song Requests can be a big encouragement for your viewers on Twitch to follow and subscribe to you.
To incentivize viewers to follow and subscribe, Moobot can be restricted to only taking Song Requests from subscribers or followers.
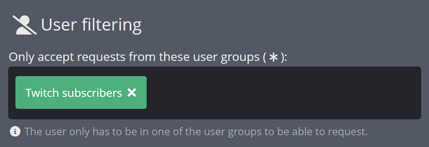
Moobot can even be set to limit the amount of Song Requests from non-subscribers/non-followers while allowing subscribers and followers to request as many songs as they want.
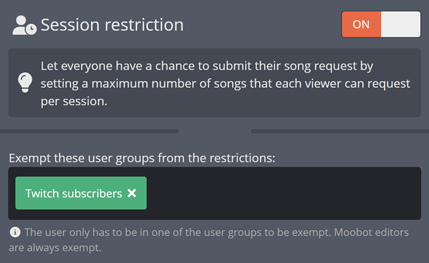
This functionality can be used as an incentive for your viewers to follow and sub, while still allowing your non-subs/non-followers to interact with you through Song Requests.
Playing songs from your personal playlist
You can add your own songs to the «Secondary playlist», and Moobot will randomly choose from it when the «Primary playlist» has no requests to play.
This allows you to play music on your stream even when your viewers aren't requesting any songs.

You can also disable requests entirely, using the song player to play only from your own playlist, or set Moobot to limit songs to only those in your secondary playlist.
This way, you can control exactly which songs are played on your stream.
Organizing your personal song playlist
Your «Secondary playlist» can be organized into «Collections», letting you quickly include or exclude entire groups of songs based on the genres or moods you want to listen to.
Follow these steps to organize your songs into a Collection:
- Create a Collection by entering its name in the
«Collection name...»input field and clicking the«Create»button.
- In the playlist, select the songs you want to add to the Collection.
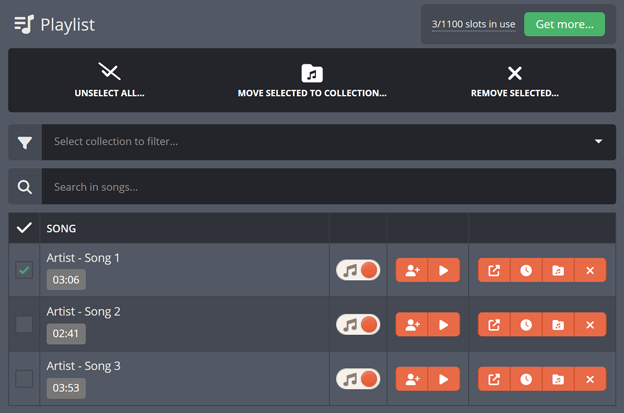
- Click the
«Move selected to Collection...»button. - In the pop-up, select the Collection you want to add the songs to.
- Click the
«Move»button.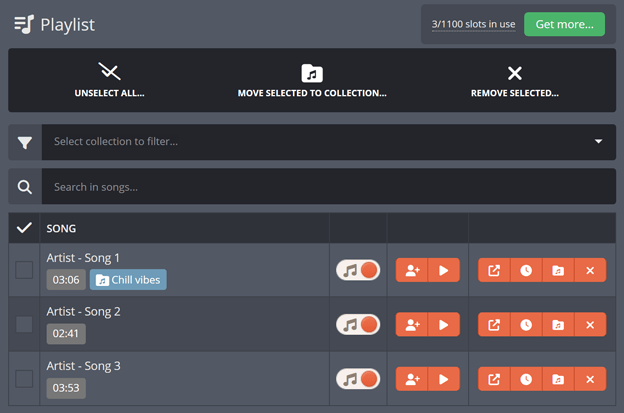
Your songs should now be organized into the Collection, and you can easily include or exclude them by toggling the Collection on or off.

Queuing up songs from your personal playlist
If you want to play a specific song from your «Secondary playlist», you can:
- Queue it up by clicking the
«Add to song queue»button for the song in the«Secondary playlist»menu, or
- Play it immediately by clicking the
«Play now»button.
Adjusting the Song Request settings
Follow these steps to adjust the Song Request settings:
- Open up the
«Features»menu from the main menu, and then open the«Special Features»menu from there.
- While in the
«Special Features»menu, find the«Song Requests»feature and use the«Options»button on the right-hand side of the feature to open its menu. - Select the
«Settings»option from the menu, which will open up the settings menu for the feature. - You can now adjust the settings to fit your needs.
- Click the
«Save»button at the bottom of the menu to save the settings.
Adjusting the maximum amount of Song Requests in the queue
To adjust the maximum total number of Song Requests in the queue, open the settings menu and change the value for «Maximum requests in the primary playlist».

Announcing when you're taking Song Requests
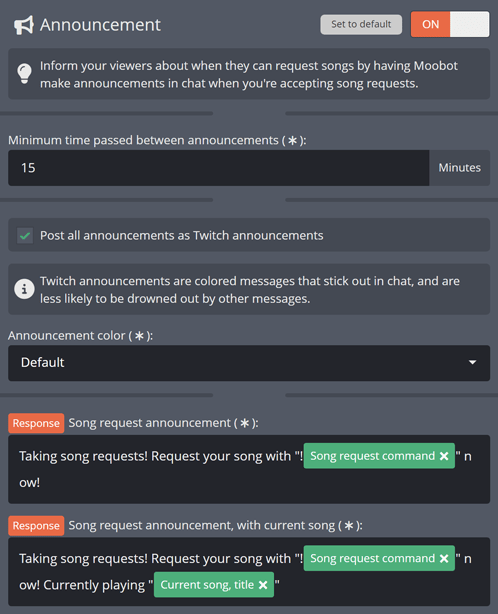
You can set Moobot to automatically announce in Twitch chat when you're accepting Song Requests. This way, your viewers will know when they can send in their requests.
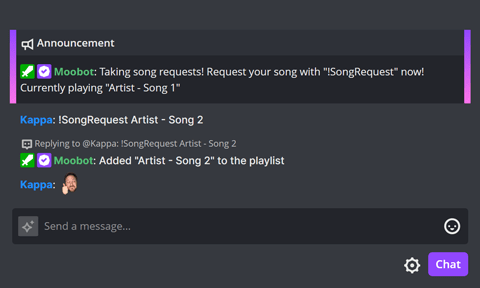
Moobot will start posting these announcements in Twitch chat whenever you play music from the dashboard's song player widget.
Simply activate the toggle and adjust the settings in the «Announcement» section of your settings to enable this functionality.
Restricting and filtering the Song Requests
While you can skip any song at any time, you can use Moobot's Song Request filtering to automatically deny any unwanted songs before playing them.
You can filter and restrict the songs you don't want to play and specify who can request songs.
All filtering and restrictions can be adjusted in the settings menu.
Only taking pre-approved Song Requests
Moobot can be set to only accept Song Requests that you have pre-approved through your secondary playlist.
This allows you to control exactly which songs are played on your stream.
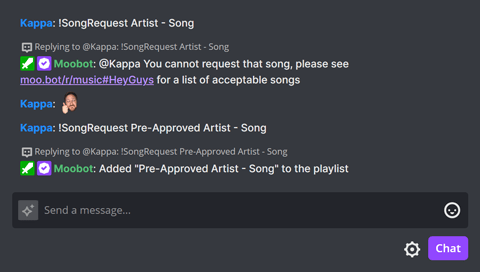
Your viewers will use your public music page to find the available songs and then request them as usual through the «!SongRequest» chat command.
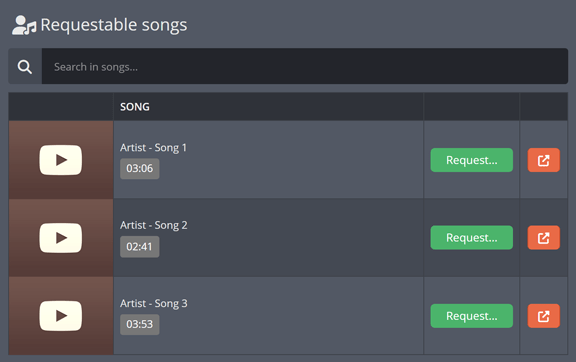
To enable this functionality, simply activate the «Only accept songs from the secondary playlist» checkbox under the «Song filtering» section in the settings menu.

When your viewers attempt to request a song that is not in your secondary playlist, Moobot will direct them to your public music page to choose from your pre-approved songs.
Setting when Song Requests are open
You can restrict when Song Requests are open so that requests only come in when you want them to. This will prevent your request queue from getting filled up with old requests.
Accepting Song Requests only when playing Song Requests
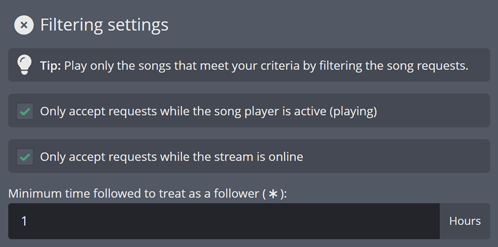
By activating the «Only accept requests while the song player is active (playing)» checkbox under the «Filtering settings» section in the settings menu, Moobot will only accept requests while you have the song player widget active and playing.
Accepting Song Requests only when the stream is online
By activating the «Only accept requests while the stream is online» checkbox under the «Filtering settings» section in the settings menu, Moobot will only accept requests while your stream on Twitch is online.
Restricting who can request songs
To specify who can request songs, select the user groups you want to accept requests from in the «Only accept requests from these user groups» input under the «User filtering» section in the settings menu.
Simply choose the desired user groups to accept requests from:
- Normal users (any users)
- Twitch subs
- (⁎) Twitch followers
- Twitch mods
- Moobot regulars
- Moobot editors
Accepting Song Requests only from viewers who have watched for a minimum amount of time
To prevent Song Requests from viewers who are not familiar with your community and music preferences, you can set a minimum watch time for your stream.
Simply activate the «Only accept requests from users who have watched a minimum amount of time» checkbox under the «User filtering» section in the settings menu and adjust the «Minimum amount of time watched» input.
Setting how many Song Requests a user can queue up
To allow each of your viewers to have a fair chance to submit their requests, adjust the «Max requests in the queue per user» to fit your needs. This will limit the number of requests a single viewer can queue up at one time.
Filtering Song Requests based on category and stats
YouTube has a vast library of songs, but not all of them may be what you want to listen to.
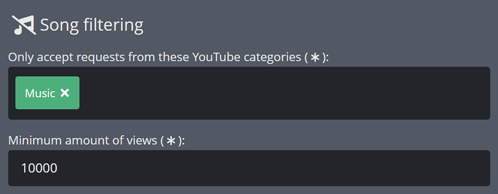
If you want to restrict requests to a certain YouTube category, you can do this by selecting your desired categories in the «Only accept requests from these YouTube categories» input.
You can also restrict requests to have a minimum amount of views on YouTube, which may help you avoid unwanted requests. Simply adjust the «Minimum amount of views» input to set the required minimum views.
Setting the maximum duration of a Song Request
To avoid one request taking up too much airtime, you can adjust the «Maximum length of song» input under the «Song filtering» section in the settings menu.
Blacklisting certain words in Song Request titles
Moobot can automatically deny Song Requests with certain words in their title.
Simply add the words you want to blacklist to the «Song title filtering» input under the «Song title filtering» section in the settings menu.

Exempting certain viewers from the filtering
You can exempt certain user groups from all your Song Request filtering by selecting the group in the «Exempt these user groups from any of the filtering» input under the «Filtering whitelist» section in the settings menu.
Limiting the amount of Song Requests for a viewer per session
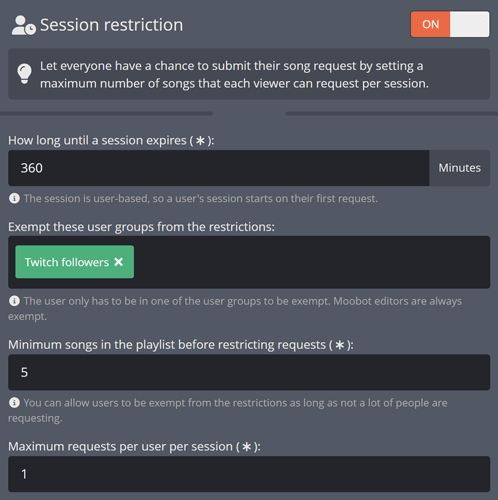
You can limit Song Requests to a certain amount of requests per user per session, ensuring that each viewer has a fair chance to request their song during your stream.
The limit can also be set to only apply when your queue is getting filled up, so you can make sure that you always have Song Requests coming in.
Simply activate the toggle and adjust the settings in the «Session restriction» section of your settings to enable this functionality.
By implementing these restrictions, you can ensure a fair and balanced distribution of Song Requests among your viewers, providing a better overall experience for everyone during your stream.
Using Song Request sessions to encourage Twitch followers and subs
Exempting your Twitch followers and/or subscribers from session restrictions allows them to request as many songs as they want.
This encourages your viewers to follow and subscribe, while still enabling non-subscribers and non-followers to request songs.
Song request blacklisting
Sometimes you don't want certain songs to play on your stream. To avoid such unwanted songs, you can use Moobot's blacklists for Twitch users, songs, and YouTube channels.
Moobot will deny any blacklisted requests and can also be set to automatically blacklist the viewer who made the unwanted request.
Blacklisting Song Requests from certain Twitch viewers
Follow these steps to blacklist Song Requests from a Twitch viewer:
- Open the
«Features»menu from the main menu, then open the«Special Features»menu from there.
- While in the
«Special Features»menu, find the«Song Requests»feature and use the«Settings»button on the right-hand side of the feature to open its menu. - In the menu, select the
«User blacklist»option, which will open up the blacklist menu. - Find the
«Blacklist a user»input at the bottom of the blacklist menu, type in the user name of the Twitch viewer you want to blacklist, and then either select the user or press the ENTER key. - The
«Blacklisted users»list should now display the blacklisted viewer.
- (Optional) If you want to only temporarily blacklist the viewer, find them in the list and click on the
«Edit»button to open its menu. - Activate the
«Expiration»toggle and adjust the date and time to when you want the viewer to be removed from the blacklist.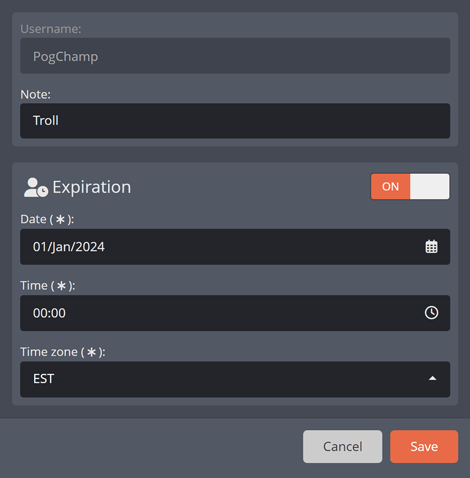
- Click the
«Save»button at the bottom of the menu to save the changes.
Blacklisting certain songs
Follow these steps to blacklist certain songs:
- Open the
«Features»menu from the main menu, then open the«Special Features»menu from there.
- While in the
«Special Features»menu, find the«Song Requests»feature and use the«Settings»button on the right-hand side of the feature to open its menu. - In the menu, select the
«Song blacklist»option, which will open up the blacklist menu. - Find the
«Add a YouTube video...»input at the bottom of the blacklist menu. - Paste the link/ID of the YouTube video or search for it and select the desired video from the list.
- The blacklisted song will now be displayed in the
«Blacklisted songs»list.
Blacklisting Song Requests from certain YouTube channels
Follow these steps to blacklist Song Requests from an entire YouTube channel:
- Open the
«Features»menu from the main menu, then open the«Special Features»menu from there.
- While in the
«Special Features»menu, find the«Song Requests»feature and use the«Settings»button on the right-hand side of the feature to open its menu. - In the menu, select the
«Channel blacklist»option, which will open up the blacklist menu. - Find the
«Add a YouTube channel...»input at the bottom of the blacklist menu. - Paste the link/ID of the YouTube channel or search for it and select the desired channel from the list.
- The blacklisted channel will now the displayed in the
«Blacklisted channels»list.

Taking advantage of the curated Song Request blacklists
Moobot offers curated blacklists for both songs and YouTube channels.
To activate the curated blacklist, go to the blacklist menu for songs and/or YouTube channels, activate the «Enable the global blacklist» checkbox, and click the «Save» button at the bottom of the menu.
Song request chat commands
Your viewers and Twitch moderators use chat commands in Twitch chat to interact with the Song Request feature.
All the chat commands for the Song Request feature are built into Moobot, and you have full control to adjust their settings and responses.
Follow these steps to activate and adjust a Song Request chat command:
- Open the
«Features»menu from the main menu, then open the«Special Features»menu from there.
- While in the
«Special Features»menu, find the«Song Requests»feature and use the«Settings»button on the right-hand side of the feature to open its menu. - In the menu, select the
«Commands»option, which will open up the commands menu. - While in the commands menu, activate the toggle button on the right side of the chat command you want to activate.

- (Optional) Click the
«Settings»button in the commands menu to adjust the settings and responses of the chat command.
!SongRequest chat command - Request songs
The «!SongRequest» chat command is how your viewers request their songs, and they can use it in Twitch chat like this:
«!SongRequest query», where the«query»is a search query. Moobot will then search YouTube for the query and choose the most relevant video.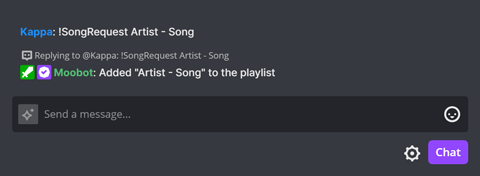
«!SongRequest video-ID», where the«video-ID»is a YouTube video ID. For example, for the YouTube video«youtube.com/watch?v=ABCDE»the video ID would be«ABCDE», and Moobot will accept either«ABCDE»or«v=ABCDE».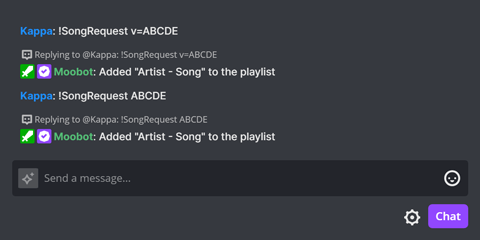
«!SongRequest link», where the«link»is a link to a YouTube video.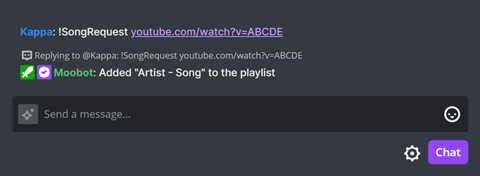
!CurrentSong chat command - Show what's playing
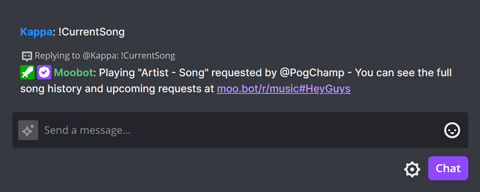
The «!CurrentSong» chat command displays in Twitch chat which song is playing through the song player widget.
!NextSong chat command - See what's playing next
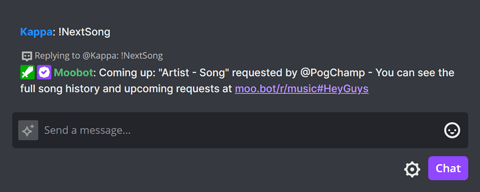
The «!NextSong» chat command displays in Twitch chat which song is playing next.
!Volume chat command - See and/or set the song volume
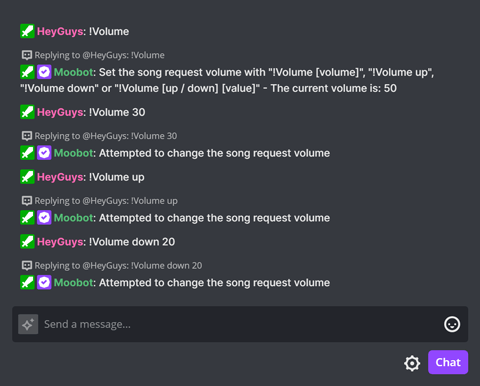
Your Twitch moderators can use the «!Volume» chat command to display and/or change the current volume of the song player widget.
The chat command can be used in Twitch chat like:
«!Volume»to display the current volume.«!Volume value»to set the volume, where the«value»is a number from 1 to 100.«!Volume up»to increase the volume by 10.«!Volume down»to decrease the volume by 10.«!Volume up value»to increase the volume by«value»with the«value»being a number from 1 to 100.«!Volume down value»to decrease the volume by«value»with the«value»being a number from 1 to 100.
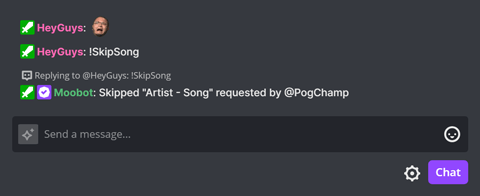
!SkipSong chat command - Skip the current song
The «!SkipSong» chat command can be used by your Twitch moderators to skip the song currently playing in the song player widget.
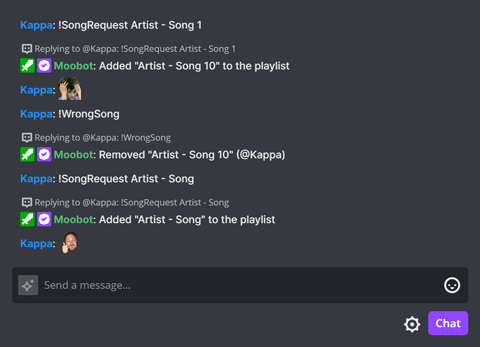
!WrongSong chat command - Remove your requested song
The «!WrongSong» chat command removes the previously requested song of whoever uses the command.
Your viewers can use this chat command if they make a mistake with their request.
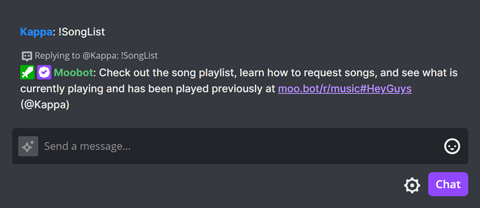
!SongList chat command - Display the public music page
The «!SongList» chat command provides a link to your public music page.
This page offers several features that allow your viewers to:
- View all song requests currently in the queue.
- Learn how to request songs.
- See which song is currently playing.
- View a history of previously played songs.
Adjusting when a song starts and ends
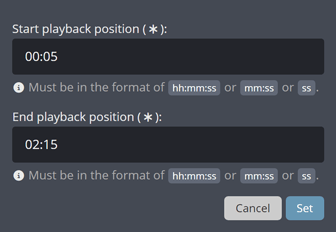
The start and end position of a song can be adjusted by setting its playback position.
Adjusting playback for songs in the secondary playlist
Follow these steps to adjust the playback position of a song in your «Secondary playlist»:
- Open the
«Features»menu from the main menu, then open the«Special Features»menu from there.
- While in the
«Special Features»menu, find the«Song Requests»feature and use the«Settings»button on the right-hand side of the feature to open its menu. - In the menu, select the
«Secondary playlist»option, which will open up the secondary playlist menu. - While in the secondary playlist menu, find the song you want to adjust the playback position for.
- Click the
«Set playback position»button for the song. - In the pop-up, change the start and end positions to your desired values.
- Click the
«Set»button to save the new playback positions.
Adjusting playback for requested songs
You can adjust the playback position of a song requested with the «!SongRequest» chat command by providing a start and end playback position when using the command in Twitch chat.
To do this, add «start=00m00s» and/or «end=00m00s» to the chat command's request, where «00m» represents the minutes and «00s» represents the seconds. Additionally, prefix it with a «#» character and separate them with a «&» character.
Examples:
The playback position is not adjusted:
!SongRequest youtube.com/watch?v=ABCDE
The playback position is adjusted to start at 1 minute and 32 seconds and ends when the video completes:
!SongRequest youtube.com/watch?v=ABCDE#start=01m32sThe playback position is adjusted to start at the beginning (00:00) and end at 1 minute and 12 seconds:
!SongRequest youtube.com/watch?v=ABCDE#end=01m12sThe playback position is adjusted to start at 30 seconds and end at 1 minute and 45 seconds:
!SongRequest youtube.com/watch?v=ABCDE#start=00m30s&end=01m45sYour public music page
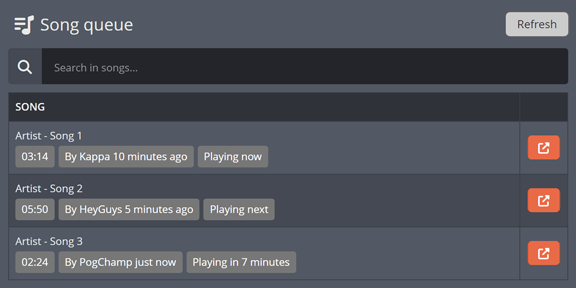
Your public music page is a publicly accessible webpage where your viewers can find all the necessary information about your Song Requests.
It can be linked in chat using the «!SongList», «!CurrentSong», and «!NextSong» chat commands.
Your viewers can use the public music page to:
- See the currently playing song.

- Check if you're accepting Song Requests and learn how to request songs in chat.

- Access helpful guides on how to request songs.

- View the full Song Request queue.
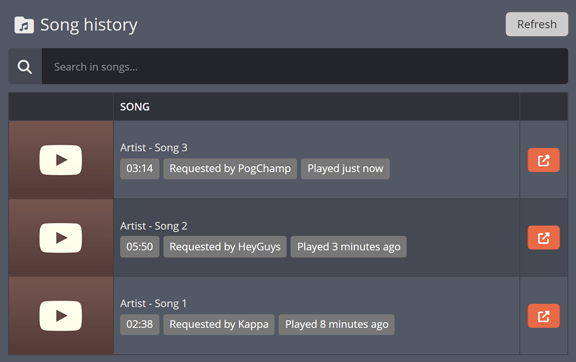
- See the history of previously played songs.
- View which songs they can request if your Moobot is set to only accept pre-approved Song Requests.

Manually moderating Song Requests
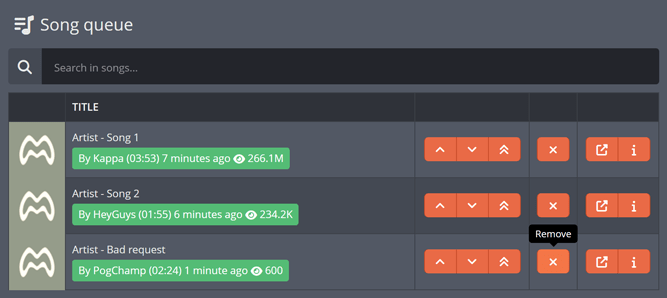
Your Twitch moderators can use the «Primary playlist» menu to remove any unwanted requests that your filtering didn't catch. This allows them to pre-screen the requests before they're played on your stream.
Be sure to grant them access to your Moobot dashboard by adding them as Moobot editors and adjusting their permissions to allow them to moderate the requests.
To reduce the workload on your moderators, you can also set Moobot to only accept pre-approved Song Requests.
Seeing your song history
Moobot keeps track of the last 50 songs you've played through the song player widget within the past week.
Follow these steps to see your song history:
- Open up the
«Features»menu from the main menu, and then open the«Special Features»menu from there.
- While in the
«Special Features»menu, find the«Song Requests»feature and use the«Settings»button on the right-hand side of the feature to open its menu. - Select the
«Song history»option from the menu, which will open up the song history.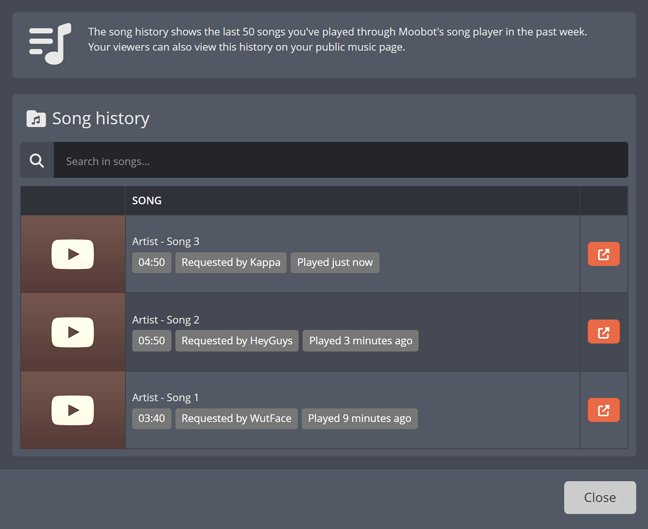
Perfecting the audio for your Song Requests
Having great audio is paramount for your stream, as it can make or break your viewers' experience. Therefore, taking some time to set up your stream's audio is essential.
Fortunately, this process is not as difficult as it may seem, as OBS offers many excellent tools to help you with this task.
The first step is to separate your audio into different sources, allowing you to control each one individually. This approach enables you to exclude the Song Requests audio from your Twitch VODs and recordings, normalize your Song Requests volume levels, and turn down the Song Requests volume while you're talking.
Separating audio capture for Song Requests in OBS
By using the latest features in OBS you can easily capture the audio from Moobot's song player with the help of the «Application Audio Capture» source, allowing you to treat it separately from your other audio sources.
Here's how you can set it up:
- Open OBS.
- Set up all your audio sources to use separate sources instead of the global
«Desktop Audio»which captures all audio on your device.- Open the Settings menu by going to
«File»>«Settings». - Under the
«Audio»section, find«Global Audio Devices»and disable«Desktop Audio».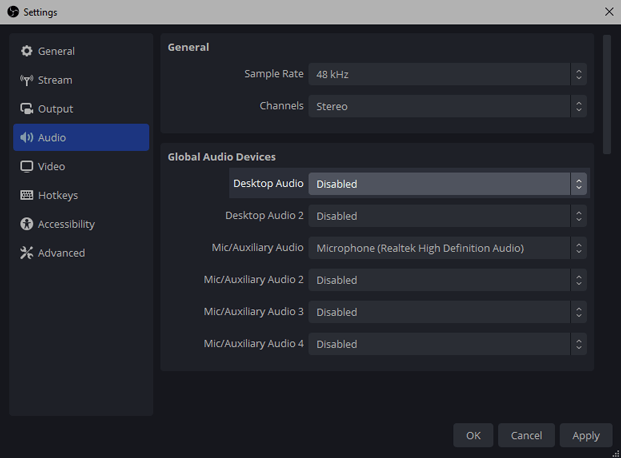
- Apply the settings and close the menu.
- Open the Settings menu by going to
- Make a nested scene that will include all your audio sources, allowing you to use them in all your scenes without having to set them up repeatedly in each scene.
- Right-click in the
«Scenes»box and select«Add». - Name the scene something like
«[NS] Audio Sources»(NS for Nested Scene) and click«OK»to create it.
- Right-click in the
- Make sure your Moobot song player is open.
- While your nested scene is selected, right-click in the
«Sources»box and select«Add»>«Application Audio Capture».- Name the source something like
«Moobot Song Player»and click«OK»to create it. - Select the window that contains the Moobot song player. Open the song player if it's not already listed.
- Set the
«Window Match Priority»to«Match title, otherwise find window of same executable».
- Click
«OK»to create the audio source.
- Name the source something like
- Add the nested scene to all your other scenes where you want the audio to be played.
- In the
«Scences»box of your OBS, select the scene you want to add the audio to. - Right-click in the
«Sources»box and select«Add»>«Scene». - Select the
«[NS] Audio Sources»scene and click«OK»to add it to the scene.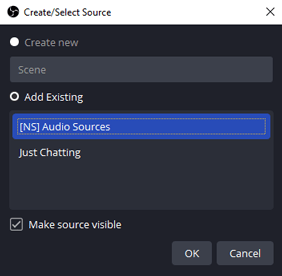
- Repeat these steps for all your scenes.
- In the
- Set up any other audio you want to capture. Make sure you create them in your nested scene.
- Use the
«Game Capture»or«Window Capture»source to capture your game.- Capture the audio from this type of source by activating the
«Capture Audio»checkbox in its properties.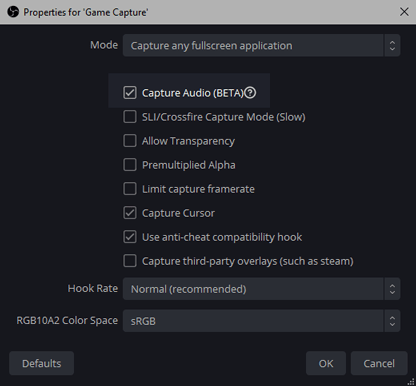
- Capture the audio from this type of source by activating the
- Create other
«Application Audio Capture»sources for other apps you want to capture audio from. - Capture the audio from your alerts.
- Use a
«Browser Source»to capture your alerts and activate the«Control audio via OBS»checkbox in its properties.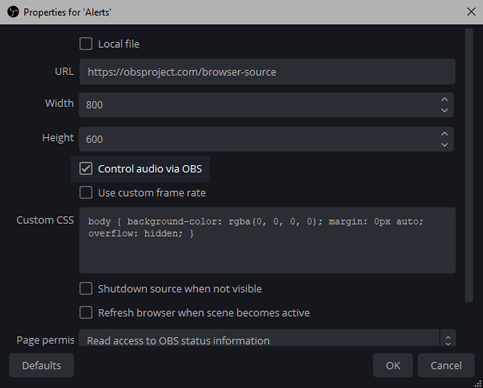
- Or use a
«Window Capture»source to capture the window that plays your alerts and then activate the«Capture Audio»checkbox in its properties.
- Use a
- Your microphone should already be added and visible in the
«Audio Mixer»as it is added as a«Global Audio Device»in your OBS settings.
- Use the
All your audio sources should now be separated, allowing you to control them individually.
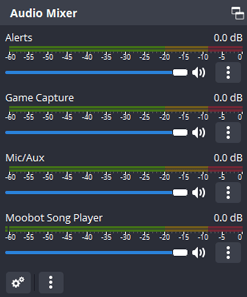
Excluding Song Requests from your Twitch VODs and recordings
When you only have the rights to play certain music on your live stream but not in your recorded content (VODs), you can exclude any audio coming from the song player from your Twitch VODs.
This audio can be excluded both from your live recorded content that goes into your Twitch VOD archive, as well as any local recordings you make to upload to YouTube or other platforms.
Twitch's Copyrighted Audio Detection system is also quite unreliable, flagging audio inconsistently and often incorrectly flagging audio that you have the rights to play. Once flagged, Twitch will mute all the audio, including your mic and game audio. By excluding Song Requests entirely from your VODs, you can avoid this issue altogether.
You can easily do this by following these steps:
- Separate the audio from your Song Requests from your other audio sources.
- Under
«Audio Mixer», open the«Advanced Audio Properties»by clicking the gear icon. - Find the audio source for your Moobot song player and set the
«Tracks»to only«1». Deactivate all the other tracks. - Make sure that the other audio sources you want in your VODs have their
«Tracks»activated.
- Click the
«Close»button to save the settings. - Open the OBS settings menu by going to
«File»>«Settings». - Under the
«Output»tab select«Advanced»in the«Output Mode»dropdown at the top of the menu.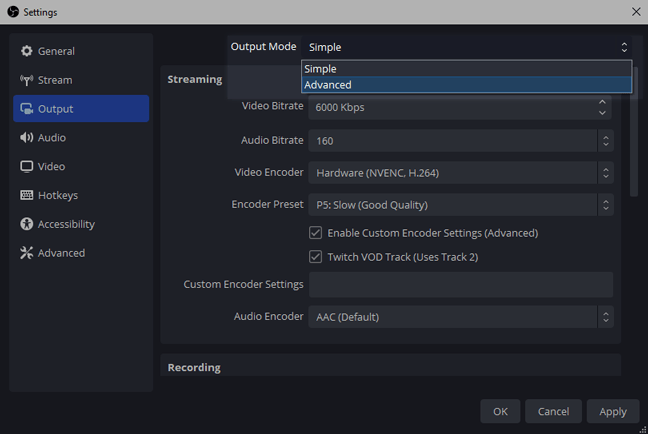
- Inside the
«Output»tab, select the«Streaming»tab. - Activate the
«Twitch VOD Track»checkbox. - Set the
«Twitch VOD Track»to«2».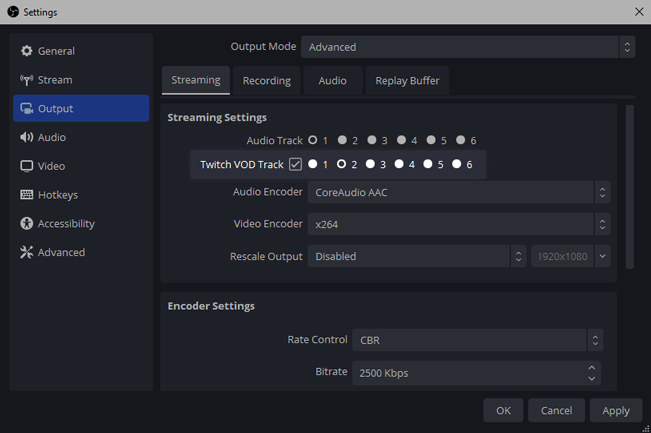
- (Optional) Do the same in the
«Recording»tab by activating audio track«2», which is the track that will have the Song Requests audio excluded. If you do not want to edit the audio tracks later, you can deactivate the other tracks if you have all your other audio sources playing on track«2».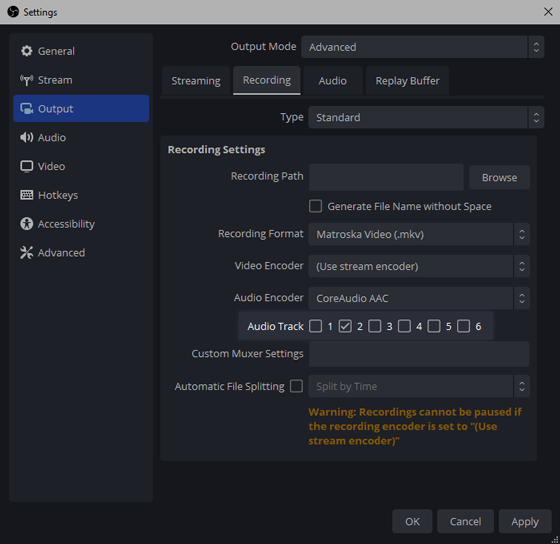
- Click
«OK»to apply the settings.
Your viewers should now be able to hear the audio from your song player on your live stream, but the audio will be excluded from your Twitch VODs and local recordings.
Normalizing your Song Requests volume levels
Some YouTube videos can have very different audio levels, which can be jarring for your viewers when the player switches between songs.
To ensure that all your Song Requests are played at the same volume, you can set OBS to normalize the audio for your song player.
Here's how you can set it up:
- Separate the audio from your Song Requests from your other audio sources.
- Find the Moobot song player audio source in the
«Audio Mixer»section of your OBS. - Right-click on the audio source and select
«Filters». - Add a
«Limiter»filter by right-clicking in the«Filters»section and selecting«Add»>«Limiter».- Set the
«Threshold»to«-20 dB», meaning the audio will be limited to this level.
- Set the
- Add a
«Compressor»filter by right-clicking in the«Filters»section and selecting«Add»>«Compressor».- Set the
«Ratio»to«4:1»which is the industry standard for music. - Set the
«Threshold»to«-35 dB»or any other value that fits your needs. - Keep the
«Attack»value at«6 ms»and the«Release»value at«60 ms». - Set the
«Output Gain»to«15 dB»or any other value that fits your needs.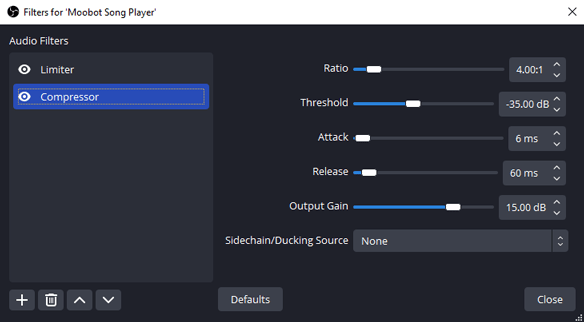
- Set the
- Close the
«Filters»menu by clicking the«Close»button.
The audio from your song player should now be normalized, ensuring that your Song Requests are not too loud or too quiet.
You can test the filters by doing a recording within OBS and then listening to the recording to see if the audio levels are to your liking. You will not be able to hear the filters in real-time as they will not be applied to your desktop audio without further setup.
Please note that if you've excluded Song Requests from your recordings, you will not be able to hear the song player's audio in your recordings. In this case, you will have to temporarily switch the audio track of your recordings to hear the audio.
Audio filter values courtesy of rStation on YouTube.Turning down the Song Requests volume while talking
To ensure that your viewers can hear you clearly when you're talking, you can set up OBS to automatically lower the volume of the song player when you're speaking, and then automatically raise it again.
This is incredibly useful when you're streaming and want to talk to your viewers without the music overpowering your voice.
With OBS, you can create a natural transition between your voice and your music by using its audio ducking functionality.
Here's how you can set it up:
- Separate the audio from your Song Requests from your other audio sources.
- Find the Moobot song player audio source in the
«Audio Mixer»section of your OBS. - Right-click on the audio source and select
«Filters». - Add a
«Compressor»filter by right-clicking in the«Filters»section and selecting«Add»>«Compressor». If you already have a«Compressor»filter from normalizing your Song Requests volume levels, create another«Compressor»filter and name it something like«Audio Ducking».- Set the
«Ratio»to«7:1», which is a mid-to-high ratio that will lower the volume significantly when you're speaking. Increase this value if you want the volume to be lowered even more. - Set the
«Threshold»to«-32 dB», which is when the compressor will start to lower the volume of the song player. This value can be adjusted to fit your needs. - Set the
«Attack»to«200 ms», which is the time it will take to reduce the volume of the song player when you start speaking. - Set the
«Release»to«850 ms», which is the time it will take to raise the volume of the song player when you stop speaking. - Keep the
«Output Gain»value at«0 dB». - Select your microphone audio source in the
«Sidechain/Ducking Source»dropdown.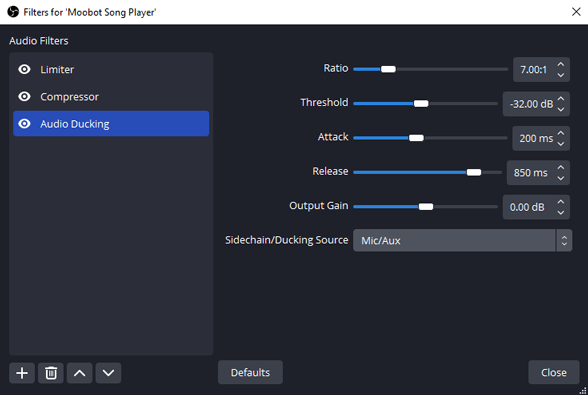
- Set the
- Close the
«Filters»menu by clicking the«Close»button.
The audio from your song player should now be lowered when you're speaking, and then raised again when you stop speaking.
You can also apply the same filter to your game audio or any other audio source you want to lower when you're speaking.
To test how it works, do a recording within OBS and then listen to the recording to see if the audio levels are to your liking. Note that the song player's audio will not be lowered for you in real-time as it will only be applied to your stream's audio.
Keep in mind that if you've excluded Song Requests from your recordings, you will not be able to hear the song player's audio in your recordings. In this case, you will have to temporarily switch the audio track of your recordings to hear the audio.
Audio filter values courtesy of askdrtk on YouTube.Using keyboard hotkeys to control the song player
You can easily control the song player by using hotkeys with Moobot Assistant. That way, you don't have to switch out of your game to skip a song or change the volume.
Hotkeys work in your other apps, full-screen included, and are available for:
- Starting the player.
- Pausing/unpausing the player.
- Skipping the current song.
- Muting/unmuting the player.
- Increasing/decreasing the volume of the player.
- Adding the current song to the secondary playlist.
- Blacklisting the current song and whoever requested it.
Displaying the current song on your stream overlay
Writing the current song to a local file
With Moobot Assistant, you can write the current song to a local file.
You can then use this file in your broadcasting software (like OBS or XSplit) to display the current song on your stream overlay.
Using an OBS plugin to display the current song and cover art
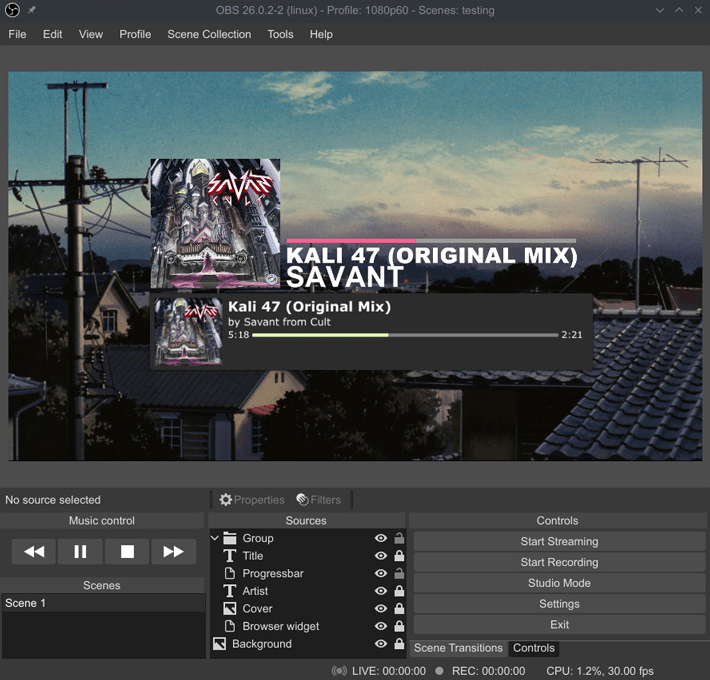
You can also use an OBS plugin like Tuna to get the information and cover art for your current song.
This information can then be incorporated into your stream overlay in a more visually appealing way.
The plugin can automatically retrieve song information directly from Windows' Media Player Controls, which displays when you use your music player either through your browser or Moobot Assistant.
Simply follow the instructions on the plugin's page to set it up.
Song Requests when streaming on Xbox or PlayStation
If you're streaming to Twitch with an Xbox or PlayStation, you will need to feed the audio from the song player into your broadcast.
One way to do this is by using a cheap audio splitter cable to feed both your microphone output and your song player output into the microphone input.
Furthermore, if you want to hear the song player's audio, you will need to split the song player output to your headset or speakers.
Common problems
The player is not playing
If you encounter the «Waiting for song to be requested, or added to the secondary playlist...» error despite having songs queued up, it indicates that the YouTube player failed to load properly.
To resolve this issue, clear your browser's cache and cookies, and then restart it.
If clearing the browser does not resolve the issue, a browser extension is often the culprit behind the player's failure. Try disabling all of your browser extensions and then attempt to play a song again. Using an incognito window in your browser can make this process easier, as the extensions will be disabled by default.
Once you have identified the problematic browser extension, permanently disable or remove it to prevent future failures.
The player is too small to comply with YouTube's guidelines
To comply with YouTube's guidelines, you must resize the song player widget to ensure it is at least 200 pixels wide and 200 pixels high.
Follow these steps to resize the song player:
- Open the
«Interface»menu in the main menu, and ensure that the«Lock UI»toggle is deactivated.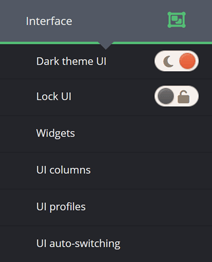
- Follow one or more of these steps:
- Make your browser's window wider.
- Use your browser's zoom feature (if available) to zoom out, giving the song player more space.
- Drag and drop the song player widget to a wider column on your dashboard.
- Use the
«UI columns»menu to adjust the width of a column by dragging its slider to your desired size. - Reduce the number of columns in the
«UI columns»menu to give more space for each column.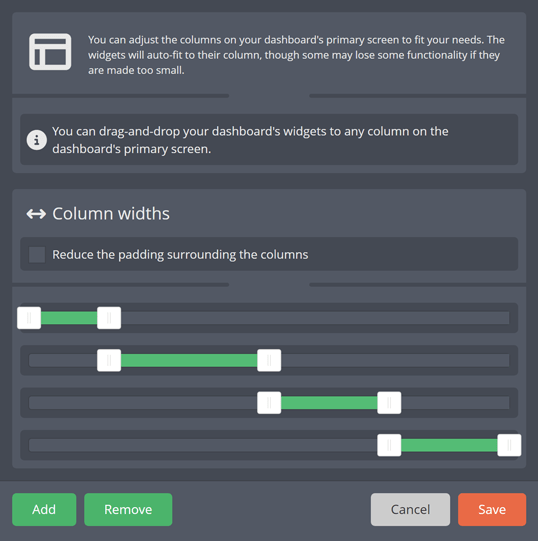
- Your song player should now be at least 200 pixels wide and 200 pixels high.