Ranking your Twitch community into Tiers
You can put your Twitch community members into Tiers, which allows you to adjust Moobot behavior depending on what Tier they belong to.
This means you can give certain members of your community on Twitch access to exclusive features, more votes in your polls, more lenient auto moderation, and many other things.
Follow these steps to set up and adjust your Tiers:
- Open up the
«User management»menu from the main menu, then open the«Tiers»menu from there.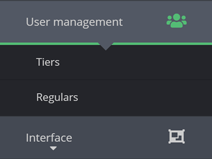
- Adjust the roles for your Tiers in the
«Current Tiers»table:- Add a role to a Tier by selecting it in the drop-down.
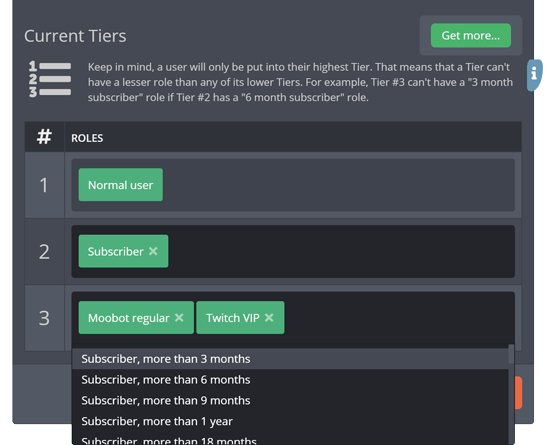
- Remove a role by clicking the
«×»button on the role.
- You can add more Tiers by clicking the
«Get more...»button at the top of the table.
- Add a role to a Tier by selecting it in the drop-down.
- Click the
«Save»button at the bottom of the menu to save your changes.
Once set up, put your Tiers to use by adjusting the settings of your other features.
Roles of a Twitch community member
A member of your Twitch community classifies as one or more roles.
All of your community members classify as the «Normal user» role, regardless of what other roles they classify as.
This means that e.g. a community member can be a normal user, while also being a Twitch sub, a 12 month Twitch sub, and a Twitch VIP.
| Condition | Possible roles |
|---|---|
| Is a viewer | Normal user |
| Is a Twitch VIP in the channel | Twitch VIP |
| Is a Moobot Regular | Moobot regular |
| Is subscribed to the channel | Subscriber, more than 3 months, ... 6 months, 9 months, 1 year, 18 months, 2 years, 2.5 years, 3 years, 3.5 years, 4 years, 4.5 years, 5 years, 5.5 years, 6 years, 6.5 years, 7 years, 7.5 years, 8 years, 8.5 years. |
| Is a Tier 1, 2 or 3 subscriber to the channel | Subscriber, Tier 1 (Twitch), Subscriber, Tier 2 (Twitch), Subscriber, Tier 3 (Twitch). |
| Has Cheered Bits in the channel | 1 or more Bits, 100 or more Bits, 1000 or more Bits, 5000 or more Bits, 10000 or more Bits. |
| (⁎) Is a Founder in the channel | Twitch channel Founder, Subscriber 1 to 101 months |
| (⁎⁎) Has watched the stream | Watched for more than... |
(⁎) Twitch channel Founders are also always a Twitch subscriber.
(⁎) Twitch channel Founders will always be detected as a Tier 1 subscriber, due to limitations with Twitch, regardless of their actual subscription Tier.
(⁎⁎) Watch time relies on the Community Loyalty feature being enabled.
Making a custom role
You can make a custom role for certain types of roles where you want to adjust the specific value of the role, e.g. how long the role has watched the stream.
Follow these steps to make a custom role:
- Open up the
«User management»menu from the main menu, then open the«Tiers»menu from there.
- Click the
«Add custom role...»button at the bottom of the«Tiers»menu to open up the dialog.
- Select which type of role you want to add in the
«Role type»drop-down of the dialog.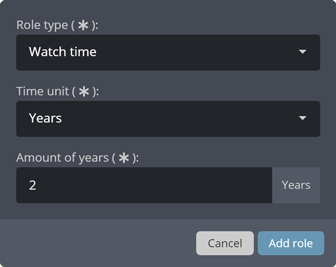
- Select the time unit in the
«Time unit»drop-down. - Type the amount of the selected time unit in the
«Amount of...»input. - Click the
«Add role»button at the bottom of the dialog. - Your custom role should now be available, and you can now add it to one of your Tiers.

Ranking a Twitch community member into a Tier
You can have multiple Tiers, numbered from 1 and up, all with different roles tied to them, with the highest numbered Tier being the most exclusive.
Your first Tier (numbered #1) has just the «Normal user» role tied to it, and since all community members classify as the «Normal user» role, they are at minimum ranked into Tier #1.
A Tier cannot have a lesser role than any of its lower Tiers, e.g. Tier #3 can't have a «Subscriber, more than 3 months» role if Tier #2 has a «Subscriber, more than 6 months» role.
This means that «6 months» is more exclusive than «3 months», and you must always put the most exclusive role into the higher-numbered Tier.
Moobot will always put a member of your Twitch community into the highest numbered Tier they apply for, even though the member may apply for any of the lower Tiers.
This means Moobot puts them into the most exclusive Tier they apply for.
Uses for ranking your Twitch community members into Tiers
Using different auto moderation settings for different community members
By combining your Tiers and Advanced mode for your built-in auto moderation message filters, you can use entirely different auto moderation settings for different members of your community on Twitch.
In the following example, we deactivate the auto moderation message filtering for certain community members (Twitch subs, Twitch VIPs and Moobot regulars), while your other community members still have their filtering activated:
- Set up your Tiers first. Skip this step and adjust the following steps if you've already set up your Tiers to your liking.
- Open up the
«User management»menu from the main menu, then open the«Tiers»menu from there.
- Set up the Tiers as the following:
- Tier #1:
«Normal user». - Tier #2:
«Subscriber». - Tier #3:
«Moobot regular»and«Twitch VIP».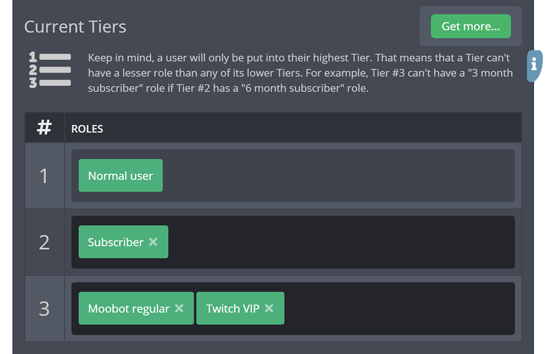
- Tier #1:
- Save your changes.
- Open up the
- Set up the built-in auto moderation message filters:
- Activate Advanced mode for your built-in auto moderation message filters.
- Adjust the profiles for your message filters. Repeat these steps for each message filter:
- Open up the
«Moderation»menu from the main menu, then open the«Message filters»menu from there.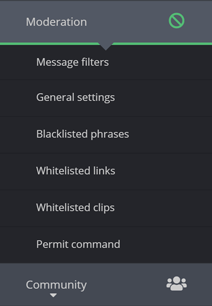
- Click the
«Settings»button for the filter you want to adjust the profiles for.
- While in the settings menu, at the bottom of the menu, click the
«Edit»button to the right-hand side of the«Setting profiles (Advanced mode)»section.
- Click the
«Add a profile»button twice, so you have 2 profiles. - Adjust Profile #1 by dragging its slider until it says
«From Tier 1 up to Tier 2». - Adjust Profile #2 by dragging its slider until it says
«From Tier 2 up to Tier 4».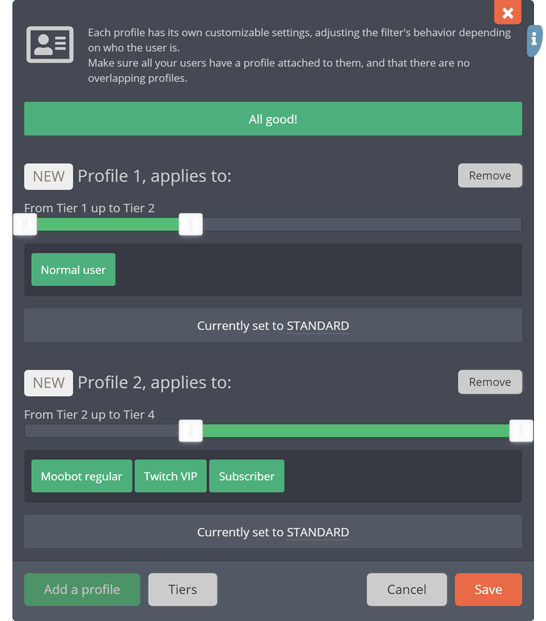
- Save your changes.
- At the bottom of the settings menu, find the Tiers 2-4 (Moobot regular, Twitch VIP, Subscriber) row in the
«Setting profiles (Advanced mode)»section, and click its (pencil iconed) edit button.
- (⁎) Deactivate the
«Enable message filtering»checkbox.
- Save your changes.
- Open up the
(⁎) In this step you can adjust the settings to whatever you want. You can e.g. make the filtering more lenient instead of turning it off.
Moobot will now exclude your Tier #2 (Twitch subs) and Tier #3 (Moobot regulars and Twitch VIPs) community members from its spam filtering.

Restricting who will be pre-approved for posting trusted content in Twitch chat
By combining your Tiers and your auto moderation whitelists, you can allow certain members of your community on Twitch to post trusted content to your Twitch chat.
In the following example, we allow your Twitch subs, Twitch VIPs and Moobot regulars to post trusted content, while your usual message filtering will still affect your other community members:
- Set up your Tiers first. Skip this step and adjust the following steps if you've already set up your Tiers to your liking.
- Open up the
«User management»menu from the main menu, then open the«Tiers»menu from there.
- Set up the Tiers as the following:
- Tier #1:
«Normal user». - Tier #2:
«Subscriber». - Tier #3:
«Moobot regular»and«Twitch VIP».
- Tier #1:
- Save your changes.
- Open up the
- Set up who will be pre-approved for your trusted links:
- Open up the
«Moderation»menu from the main menu, then open the«Whitelisted links»menu from there.
- Drag the slider for
«Users who can post whitelisted links»until it says«Tiers 2 and up», and only displays«Moobot regular»,«Twitch VIP»and«Subscriber».
- Open up the
- Set up who will be pre-approved for clips from trusted Twitch channels:
- Open up the
«Moderation»menu from the main menu, then open the«Whitelisted clips»menu from there. - Drag the slider for
«Users who can post whitelisted clips»until it says«Tiers 2 and up», and only displays«Moobot regular»,«Twitch VIP»and«Subscriber».
- Open up the
Your Tier #2 (Twitch subs) and Tier #3 (Moobot regulars and Twitch VIPs) community members can now post your pre-approved content to your Twitch chat.
Allowing certain community members to bypass blocked words, phrases and behavior
By combining your Tiers and your auto moderation blacklists, you can allow certain members of your community on Twitch to bypass your blacklists.
In the following example, we allow your Twitch VIPs and Moobot regulars to bypass your blacklists, while your other community members will have the blacklists applied to them as usual:
- Set up your Tiers first. Skip this step and adjust the following steps if you've already set up your Tiers to your liking.
- Open up the
«User management»menu from the main menu, then open the«Tiers»menu from there.
- Set up the Tiers as the following:
- Tier #1:
«Normal user». - (Optional) Tier #2:
«Subscriber». - Tier #3:
«Moobot regular»and«Twitch VIP».
- Tier #1:
- Save your changes.
- Open up the
- Whitelist the Tiers in your blacklist:
- Open up the
«Moderation»menu from the main menu, then open the«Blacklisted phrases»menu from there.
- Open the edit-menu of a blacklisted phrase by clicking its (pencil iconed) button.
- Drag the slider in the
«Whitelist»section of the settings menu until it says«Tiers 3 and up», and only displays«Moobot regular»and«Twitch VIP».
- Save your changes.
- Repeat the steps for each blacklisted phrase.
- Open up the
Your Tier #3 (Moobot regulars and Twitch VIPs) community members will now bypass your blacklisted phrases.
Giving certain community members additional chances to win your giveaways
By combining your Tiers and your giveaways, you can give certain members of your community on Twitch additional chances to win a giveaway.
In the following example, we will give your Twitch subs two chances to win the giveaway, while your Twitch VIPs, Moobot regulars and 1 year (and up) Twitch subs will have three chances to win, and your other community members will only have one chance to win the giveaway:
- Set up your Tiers first. Skip this step and adjust the following steps if you've already set up your Tiers to your liking.
- Open up the
«User management»menu from the main menu, then open the«Tiers»menu from there.
- Set up the Tiers as the following:
- Tier #1:
«Normal user». - Tier #2:
«Subscriber». - Tier #3:
«Moobot regular»,«Twitch VIP»and«Subscriber, more than 1 year».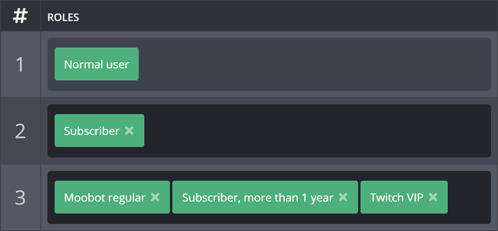
- Tier #1:
- Save your changes.
- Open up the
- Create your giveaway:
- Open up the
«Community»menu from the main menu, then open the«Giveaways»menu from there.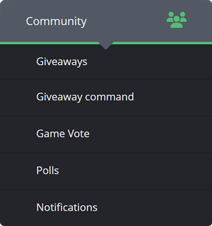
- Click the
«Create giveaway»button at the bottom of the menu. - While adjusting the settings of the giveaway, activate its advanced options.
- Drag the sliders in the
«Multipliers»section to the following:- For
«Tier 1»entrants, keep it at«one chance to be drawn». - For
«Tier 2»entrants, drag the slider to«2 times the likelihood to be drawn». - For
«Tier 3»entrants, drag the slider to«3 times the likelihood to be drawn».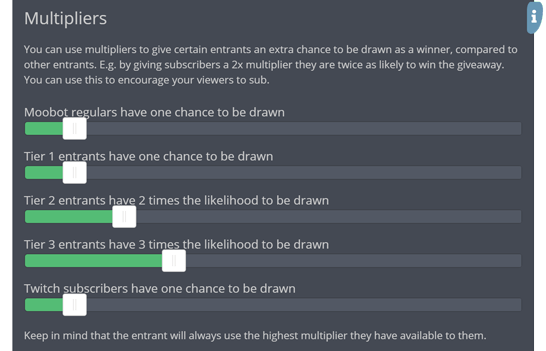
- For
- Create the giveaway.
- Open up the
Your Tier #2 (Twitch subs) community members will now have 2 chances to win the giveaway, your Tier #3 (Moobot regulars, Twitch VIPs and 1 year Twitch subs) will have 3 chances to win, while anyone else will only have one chance to win.
Restricting your giveaways to certain community members
By combining your Tiers and your giveaways, you can restrict entries to only certain members of your community on Twitch.
In the following example, we will restrict a giveaway to only accept entries from any of your Twitch subs who have subscribed to you for 1 year or more:
- Set up your Tiers first. Skip this step and adjust the following steps if you've already set up your Tiers to your liking.
- Open up the
«User management»menu from the main menu, then open the«Tiers»menu from there.
- Set up the Tiers as the following:
- Tier #1:
«Normal user». - (Optional) Tier #2:
«Subscriber». - Tier #3:
«Subscriber, more than 1 year».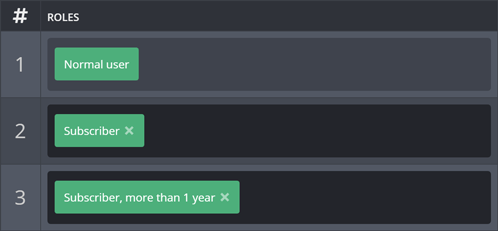
- Tier #1:
- Save your changes.
- Open up the
- Create your giveaway:
- Open up the
«Community»menu from the main menu, then open the«Giveaways»menu from there.
- Click the
«Create giveaway»button at the bottom of the menu. - While adjusting the settings of the giveaway, activate its advanced options.
- Activate the
«Only the users with a minimum Tier can participate»checkbox in the«Participation»section, and drag the slider to«Tier 3 and up», where it only displays the«Subscriber, more than 1 year»role.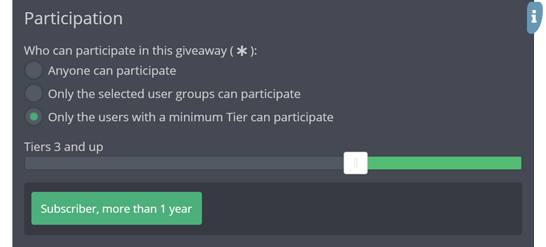
- Create the giveaway.
- Open up the
Your giveaway will now only accept entries from your Tier #3 community members (Twitch subs who have subscribed to you for 1 year or more.)
Giving certain community members additional votes in your polls
By combining your Tiers and your polls, you can give certain members of your community on Twitch additional votes in your polls.
In the following example, we will make each vote of your Twitch subs count as two votes, while a vote from your Twitch VIPs, Moobot regulars and 1 year (and up) Twitch subs will count as three votes, and a vote from any of your other community members will only count as one vote:
- Set up your Tiers first. Skip this step and adjust the following steps if you've already set up your Tiers to your liking.
- Open up the
«User management»menu from the main menu, then open the«Tiers»menu from there.
- Set up the Tiers as the following:
- Tier #1:
«Normal user». - Tier #2:
«Subscriber». - Tier #3:
«Moobot regular»,«Twitch VIP»and«Subscriber, more than 1 year».
- Tier #1:
- Save your changes.
- Open up the
- Create your poll:
- Open up the
«Community»menu from the main menu, then open the«Polls»menu from there.
- Click the
«Create poll»button at the bottom of the menu. - While adjusting the settings of the poll, activate its advanced options.
- Drag the sliders in the
«Multipliers»section to the following:- For
«Tier 1»voters, keep it at«one vote». - For
«Tier 2»voters, drag the slider to«2 votes». - For
«Tier 3»voters, drag the slider to«3 votes».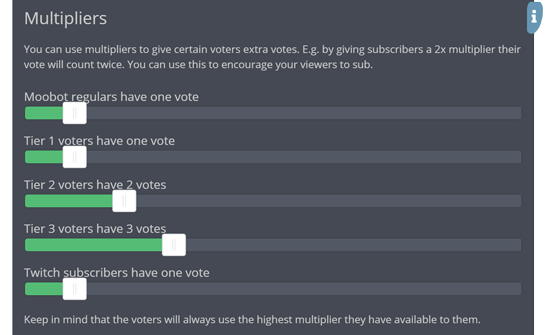
- For
- Create the poll.
- Open up the
Your Tier #2 (Twitch subs) community members will now have 2 votes for each of their votes, your Tier #3 (Moobot regulars, Twitch VIPs and 1 year Twitch subs) will have 3 votes for each of theirs, while anyone else will only have one vote for their vote.
Restricting your polls to certain community members
By combining your Tiers and your polls, you can restrict voting to only certain members of your community on Twitch.
In the following example, we will restrict a poll to only accept votes from any of your Twitch subs who have subscribed to you for 1 year or more:
- Set up your Tiers first. Skip this step and adjust the following steps if you've already set up your Tiers to your liking.
- Open up the
«User management»menu from the main menu, then open the«Tiers»menu from there.
- Set up the Tiers as the following:
- Tier #1:
«Normal user». - (Optional) Tier #2:
«Subscriber». - Tier #3:
«Subscriber, more than 1 year».
- Tier #1:
- Save your changes.
- Open up the
- Create your poll:
- Open up the
«Community»menu from the main menu, then open the«Polls»menu from there.
- Click the
«Create poll»button at the bottom of the menu. - While adjusting the settings of the poll, activate its advanced options.
- Activate the
«Only the users with a minimum Tier can participate»checkbox in the«Participation»section, and drag the slider to«Tier 3 and up», where it only displays the«Subscriber, more than 1 year»role.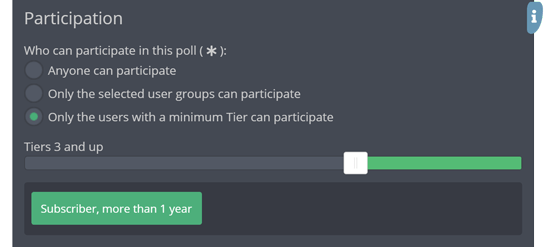
- Create the poll.
- Open up the
Your poll will now only accept votes from your Tier #3 community members (Twitch subs who have subscribed to you for 1 year or more.)